This has been an interesting summer and beginning to the fall. After being with the same Web Host since 1999 I decided that I no longer had confidence in the hosts up time. After doing some research I decided to move to Host Gator. That was the easy part.
The hard part was going through the process of moving a number of WordPress and Joomla sites to the new host. If you’ve decided to move hosts but are unsure how to transfer your site its not that difficult. Hopefully this step by step guide to moving a WordPress site to a new host will help.
Step 1: Download your files via FTP from you existing site. We will upload these files to your domain account on your new server.

Step 2: Export WordPress Database from phpMyAdmin
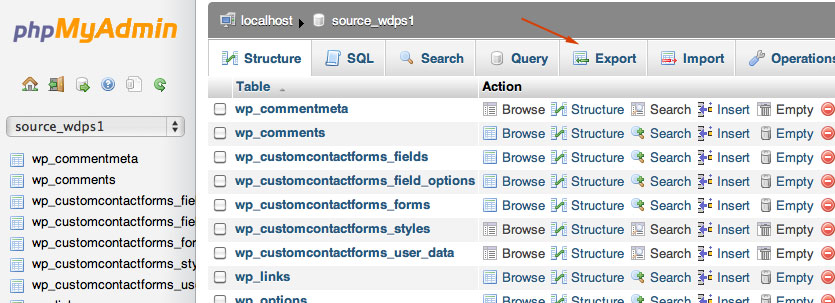
In the backend of your host (CPANEL) click on phpMyAdmin and click on the DATABASE Tab. You will see the databases you have on the left side. Click on your WordPress database.

After clicking on your database name you will see the database tables. Click on the EXPORT Tab.

After clicking the EXPORT Tab you will see a simple interface. You should be able to export the file with the existing settings. Click the GO button to begin your download and save the files to your computer.

Step 3: Import your Database to Your New Host. (You should have created your domain account before doing database upload).
Log in to your backend (CPANEL) and Create a new Database by clicking on MySQL Databases.

After creating your database you need to add a user to your database. Add a username and password, then click the CREATE USER button.

Now that you have created a username you need to add it to the database. Be sure to grant all privileges to the user.

Now go into phpMyAdmin and click on the database you created. Then click on the IMPORT Tab. Once on the IMPORT page click the Choose File button and select the database you previously downloaded. Once again you should be able to use the existing setting. Click the GO button to import your database.

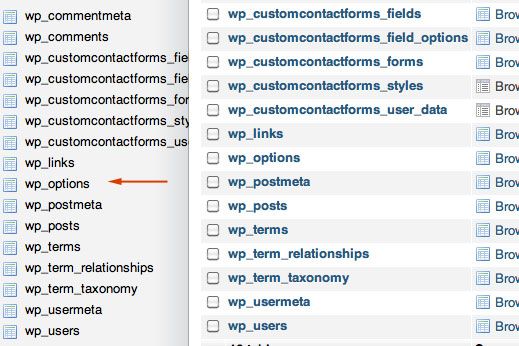
Once your database is finished uploading we need to make some additional changes to the database in the OPTIONS table. Click on the STRUCTURE Tab and you will see a list of database tables to the left. Click on the Options table.

The first option we wan to edit is SiteURL which should be the first option. Click the edit button and change the URL to your new http:// address.

The second option we want to update is on page two, the Home option. Click the edit button and change the value to your home page url.
![]()
The final option to update is on the second page as well, Upload Path. Once again click on the edit button and input the url where you upload files to your wordpress installation. (In the sites I have moved I have not had to change this value.
![]()
Step 4: Upload Site Files Via FTP (Files you downloaded in Step 1)
Step 5: Update wp-config.php File
Your wp-config.php file currently has the information from your previous database. We need to update the Database Name, the Username, the Password, and you may need to update the Local Host name.

Once you have made the changes upload the file via FTP.
That’s it. Your site should now be up and running on your new host.